

Prices for about everything have skyrocketed this year, and the cost of nursery plants is no exception. But with a bit of planning while learning some basic plant propagation techniques, you can avoid increasing your plant budget without sacrificing your new-year garden plans.
March is a perfect month to propagate woody plants for a new shrub, hedgerow, or even new trees in your landscape—for free (or close enough). Propagating hardwood cuttings from dormant woody plants is probably the easiest method for beginners and it gives you a reason to play outdoors during winter.
First, decide what new plants you want to add. Perhaps you have an unsightly or unstable bank, and you want to plant beautiful Dappled Willow along it. Good choice. The willow is stunning in spring, fast growing, and its roots will help anchor the soil to the hillside. And best of all, it’s easy to propagate right now. All you have to do is find a neighbor who has one, ask if you can take a few cuttings, and follow the steps below.
Or, maybe you want to expand your rose garden and failed to cut the canes back in the fall. Correct your fortuitous mistake, and cut the canes back by following the steps below. By fall you will have some great roses ready to excite your senses in 2027.
Propagating hardwoods is fast, and as long as you research your desired plant to make sure it responds well to hardwood propagation, it is reliably successful. WSU Extension provides a detailed list of shrubs and trees that propagate well: https://pubs.extension.wsu.edu/product/propagating-deciduous-and-evergreen-shrubs-trees-vines-with-stem-cuttings.
STEP 1: Once you choose your preferred species, look it up on the web using either its common name or its scientific name, plus “hardwood propagation.” The search results should tell you if that species lends itself to hardwood propagation. Next, if you don’t already know where that species is growing, either modify your plant list, or buy a specimen at a nursery that you can use as the mother plant. (Do check to make sure it was trademarked before 2006.) Only take cuttings from healthy, disease-free plants.
STEP 2: Ask the property owner for permission to take cuttings if it’s not on your property.
STEP 3: Although most hardwood cuttings follow identical steps, do check to see if your species needs a hardwood hormone to aid root development. Then assemble your bottle of hormone, a sterilized bypass clipper, alcohol to wipe down the clipper between cuts to maintain sterilization, and a cleaned gallon nursery pot. (Don’t skip the sterilization step: soak the washed pot in 10% bleach for 30 minutes. Soil diseases are best avoided.)
You can use a loose, well draining soil, but our Master Gardener propagation team has determined that for us, silica sand is the most reliable and cleanest medium to root hardwoods. Our local hardware stores sell it as swimming pool filter sand (about $20 for 50 pounds). Or you can use washed sharp sand/fine gravel to cut costs even more. It works well, but is messier. If you elect to propagate more plants in the future, placing the silica sand in a metal tray, then roasting the sand for one hour in a 350 degree oven, sterilizes the sand. Avoid fine or “play sand” as it will not drain well.
STEP 4: You can then harvest your cuttings with one snip below a node (the place where leaves and buds attach to the plant stem) and the second cut above a node, leaving a minimum of two nodes on each cutting with three or more nodes being ideal. A single branch may allow you to make several usable cuttings, but one- and two-year old wood is easiest to root.
You can harvest a variety of sizes, but a pencil-size diameter seems to result in the best rooting. IMPORTANT: you must orient the cuttings exactly as they were on the plant. The bottom end goes into the soil, the top end stays above the soil level. Many advisors recommend cutting a slanted cut on the top (or bottom) to help you remember the orientation, but if you plant the cuttings as you work, it’s less cumbersome and not necessary. Do remember to dab a thin layer of powdered or liquid hormone on the bottom cut if you are using a hormone.
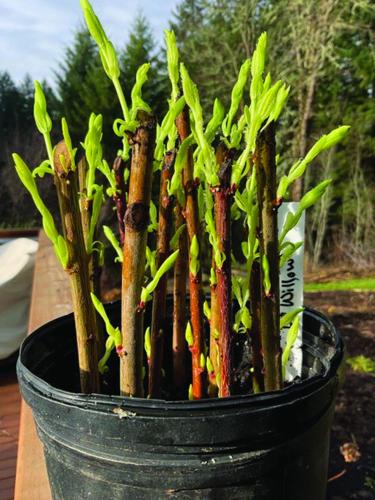
A one-gallon nursery pot can easily hold 10 to12 cuttings — probably enough for your new, impressive bank planting. Now all that’s left for you to do is to place the pot of cuttings in your unheated garage (if it does not freeze), watering just often enough to keep the sand slightly moist and avoiding letting it stand in water. After the last frost date, you can check to see if roots and leaves have developed. If so, up-pot each cutting to a gallon pot or plant it in the ground where you want it to remain. Do shelter the plant from direct sunlight for a couple of weeks, slowly exposing it to more sunlight. Once it’s adapted, you can begin applying a light fertilizer following directions on the container.
Your new garden is now planted and other than the pricey hormone and silica sand (each about $20), you did it on the cheap!
However, if you procrastinated and didn’t plant your own Dappled Willow cuttings before bud break, come down and buy ours. Master Gardeners were out all winter assembling cuttings, right-side-up, to have what you need for a bargain price. The 2026 Master Gardener Plant Sale will be held on May 9. We look forward to seeing you there.
For more information on propagating hardwood cuttings, refer to the excellent Royal Horticultural Society site: https://www.rhs.org.uk/propagation/hardwood-cuttings. You can also follow similar steps for taking fall cuttings, as outlined in this OSU Extension publication: https://extension.oregonstate.edu/news/turn-fall-cuttings-free-plants-spring.


Commented